The Human On the Loop: A Practical Guide to Agentic Engineering

The Automation Gap
Problem: The bottleneck from having a human-in-the-loop prompting and verifying agents’ work.
Solution: Move the human from being IN the loop to being ON the loop. Shift the role from actively telling the agents what to do and verifying their work, to overseeing and steering the agents only when needed. Let the agents verify their own work. That’s how we unlock the true potential of AI Tooling to increase engineering efficiency and software quality.
How: The Agentic Loop; a technique that consists of invoking agents in a loop until they reach a completion state.
In this article I will explain the mechanics of an Agentic Loop, its components, and practical tips from my own experience, so you can get the most out of this technique if you decide it is a fit for the problem you are trying to solve. Let’s unpack this technique.
The term Ralph Loop has been coined by Geoffrey Huntley, after The Simpsons character Ralph Wiggum, to refer to the Agentic Loop technique covered in this article.
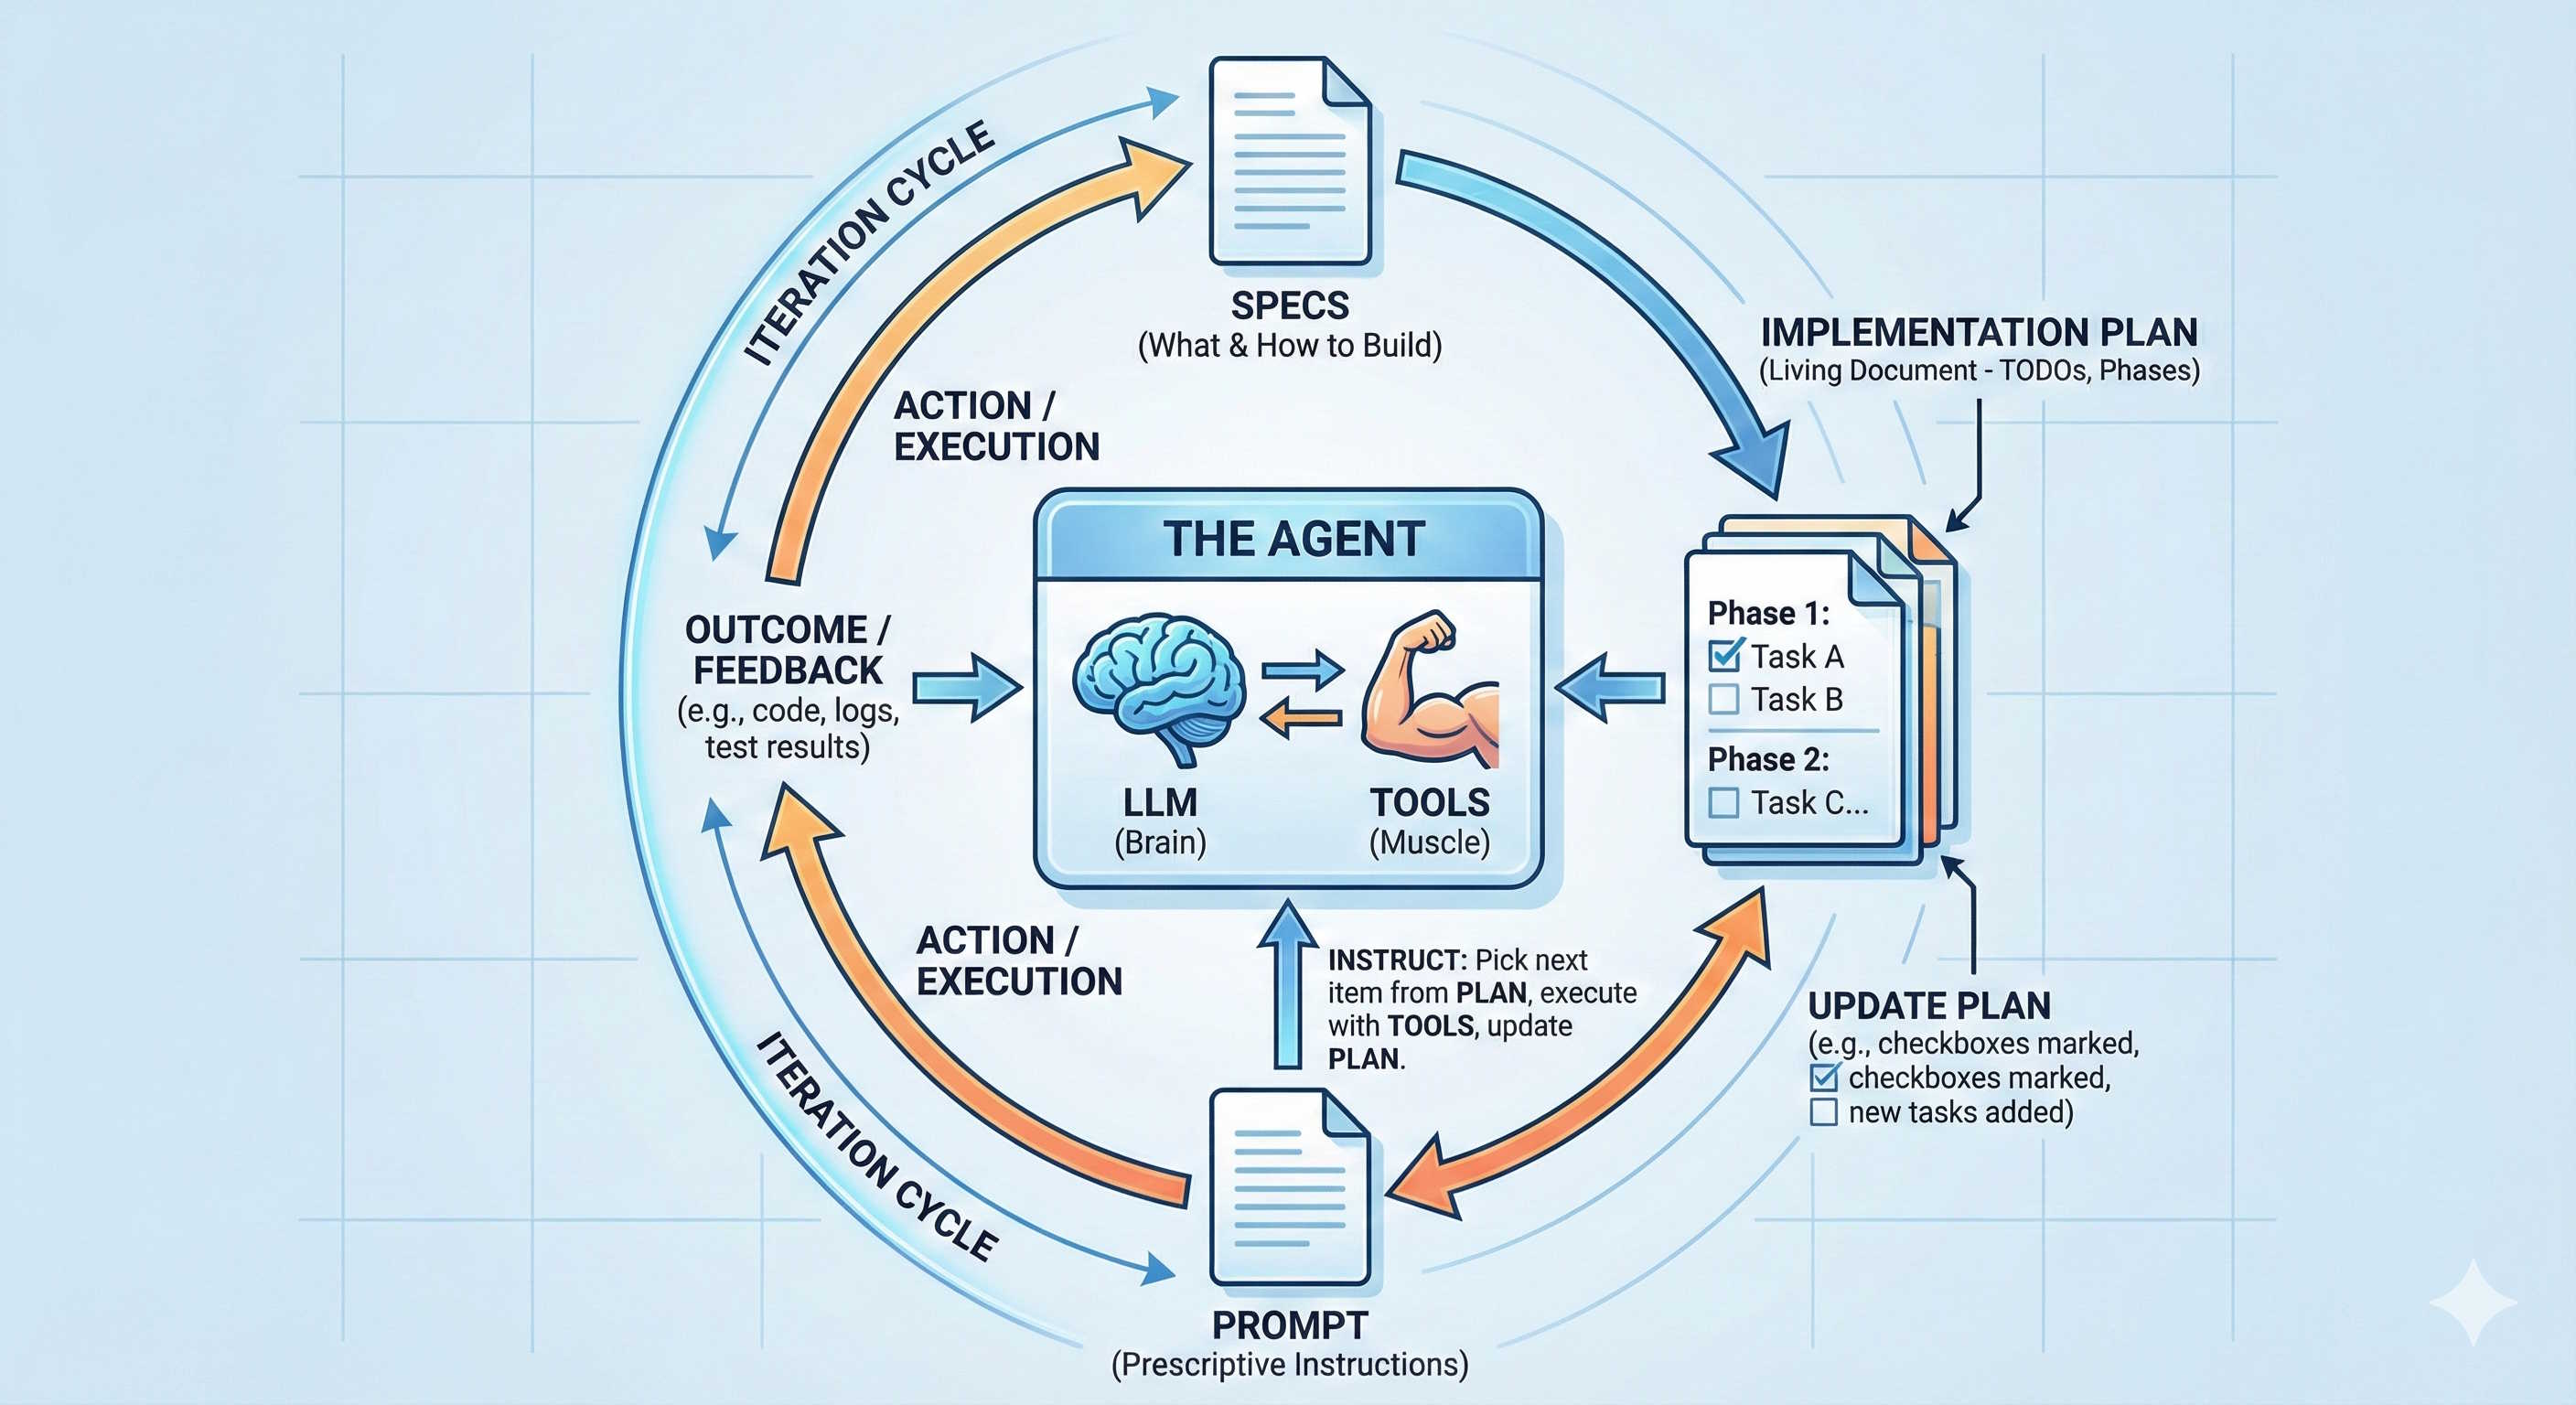
First Principles: The Anatomy of the Stateless Loop
The beauty of this technique is its simplicity. The loop itself is ‘dumb’; just calling an agent repeatedly in a loop. The agent inside the loop knows nothing about the loop itself. The only context it has is that provided in the current iteration.
In its most basic form, this is what it is using claude code CLI. It could be adapted to use other CLI agents.
#!/bin/bash
while :; do cat PROMPT.md | claude; done
This technique is supported by 4 pillars:
- The agent; consisting of LLMs (the brain) + Tools (the muscle).
- The specs; describing what the agent must build, and how. They are referenced in the prompt.
- The implementation plan; a living document, created from the specs, and used by the agent to keep track of its progress through iterations. This should be a clear breakdown of phases and tasks, like a TODO list, for agent to pick items from on each iteration. The plan is also referenced in the prompt.
- The prompt; generic instructions to the agent on how it should operate regarding picking items from the plan, and updating the plan with the outcome of each iteration. Here you should try to infuse some determinism to the agent, by being as prescriptive as you can.
These pillars are not different from those supporting the manual interactions with an agent; we just put them together, in a cohesive and structured way, to make the loop work autonomously.
Let’s dive into each of these pillars and the process involving each of them. To get a successful outcome from applying this technique, these components must be tightly coupled, high cohesion. Poor choice of models or tools, ambiguity in the specs or plan, or unclear instructions in the prompt will lead to failures from applying this technique.
Specifications
Everything should start by specifying what do we want the agent to do, and how. The more explicit and clear we are here the better the loop will operate. There will be less chances of scope creeping and agent going off-track. So, make sure your specs are solid. I’m pretty sure you’ve heard before how important specs are when building software, even before this agentic movement, but worth repeating here. In this new world, where we look to automate the process of building software, this is even more important.
TIP 1: When creating the specs I generally use a powerful LLM, such as Opus. You want the best brain power available when thinking about the problem you are trying to solve and how to solve it. A powerful LLM will make sure you get the best possible specs, with your guidance, of course. You don’t want to skimp on this phase, believe me. These will be well spent tokens.
TIP 2: Once you have the first draft of the specs, these are not the final specs. Enlist again a powerful model (same or different) to find gaps, inconsistencies. Iterate over them until they are sound. Then, and only then, you can move to create the implementation plan.
Implementation Plan
The specs are the map or blueprint; the what and the how. The implementation plan will be the TODO list for the agent to pick tasks from on each iteration. It should be a breakdown of phases and independent tasks; the simpler, the better. Don’t include instructions here on how to implement things, this should go on the specs. Reference the specs instead. The specs should be the single source of truth, the plan should just serve as a TODO list.
TIP 1: Same as for the specs, use an agent to write the implementation plan from the specs. In this case you don’t need a powerful LLM, as it is more about translating the specs into tasks. Any capable LLM can do this well enough. Don’t waste many tokens on this.
TIP 2: When creating the plan, make sure the priority of phases and tasks is clear. That would make it easier for the agent to pick ’the most important thing’ on each iteration. You can ask the model assisting you to make the priority clear for items in the plan.
Prompt
The prompt for this technique should be rather static and generic. It must contain these main instructions at least:
- Read the specs
- Read the implementation plan
- Select the single most important task from the plan and work only on that
- During your turn, if you find issues, document them in the implementation plan
- When you complete that single task, update the plan with progress, commit your changes and end your turn
TIP 1: As you observe your agent work (yes you must observe it), you will realise you need to add things to the prompt to ensure the agent works more efficiently and effectively in future iterations. It is particularly important to observe the agent working during the initial iterations, and amend the prompt accordingly, as issues tend to compound. The longer you wait to correct and steer the agent, the wider the mess and more tokens you will have burned for nothing. Here is an example prompt I’ve refined and used with this technique to work on several real world problems in the last month.
TIP 2: The ‘commit your changes’ instruction is essential. This is your safety mechanism to bring back the agent to the right path when they drift. It might be a good idea to also push the changes made on every turn to a remote repository, as that would make it easier to share with your team, so you can share the responsibility of observing the agent.
Brain and Muscle
The Brain (LLM) and Muscle (Tools) can make or break this technique, as any other parts in it (remember it is a tightly coupled system). This is the actual agent. This is what we put in a loop, hoping it will incrementally go through the plan, ticking off tasks one by one, until there are no more, and specs are satisfied. For this iterative phase, you need a capable model, but not necessarily the most powerful model. I’ve found Sonnet to be a very capable model to use during this iterative process. The right model here is very dependent on the complexity of the problem and codebase you are working on. Experiment with different models (if you can) and use the one that delivers you the best value.
Let’s talk about tools. Most of the agents in the market today are capable of using standard tools to read and write files, execute commands in the bash to build, test and run your apps, fetch content from internet and many other things. This will work out of the box. For simple apps and projects, that might be enough. In other cases, you might need specialised tools, that might be specific to the tech stack you are working on. You should configure these tools in the environment your agent will run, and include instructions about these special tools so the agents know they exist and how to use them. An example could be if you want the agent to push changes to a remote GitHub repository, you should install and configure gh CLI for the agent to use. Similarly, if you want your agent to monitor your build pipeline in CircleCI, you must install and configure circleci CLI tool for that end.
A powerful and scary thing is that agents can write their own tools. This gives them superpowers. This allows them to get unblocked when ’traditional’ things don’t work or available tools are not enough. This makes these agents very resourceful. You need to assess the risk-benefit in this case. To be safe you should consider running these loops in an isolated environment, for example a container with limited access to resources, where the potential damage is controlled and acceptable.
TIP 1: Although the above code snippet for the most basic loop implies it might be infinite, in reality it should not. Do not run an agent in an infinite loop; always make sure you have a clear well defined breaking condition. A safety and simple mechanism is adding a variable to control the maximum number of iterations.
TIP 2: When starting to work on a fresh project, clean plan, keep a close eye on what the agent is doing. Steering it early will ensure it gets off ground well and creates good foundations for future work under less supervision. Start with a small number of iterations at the beginning. Stop it and steer it as needed. As you see it behaving more as you would expect, you can increase the maximum number of iterations and let it be.
TIP 3.1: In some cases, even if you take all precautions, the agents will go off-track. There is nothing you can do to prevent this from happening entirely. You must accept that before using this technique. Look at this as the eventual-consistency trade-off when working with distributed systems. The network is unpredictable and so are the agents. So, how do you bring the agents back to line? Using the git history. You must first identify the commit when it started to drift, then reset to previous commit, as the latest known good one to start over. Very important, don’t skip, you must understand what led the agent into that undesirable outcome, and update the prompt, the plan or the specs to avoid this happening again. Then, kick off the loop again, and observe the impact your changes have in the agent behaviour. In this case, you are the human ON the loop, overseeing the agent work, and steering only when necessary.
TIP 3.2: When you catch the agent off-track too late to easily figure out when things went wrong, after many iterations, it might be time consuming and tedious to find out the first poisonous commit. Use an agent to explore your specs and git history, and do it for you. The agents are very capable working with git, reading through git diffs, and contrasting that against your specs (the source of truth).
TIP 4: Your agent MUST have enough tools and knowledge to verify their own work. This is a fundamental piece to fully remove the human-in-the-loop bottleneck and unblock the agent to deliver software autonomously. The knowledge is in the specs, the tools are project and codebase specific. You are not supposed to review every single line of code the agent produces. This does not scale well if you try to do that. If you feel you need to do that, this technique might not be suitable for solving your problem. As a Software Engineer, you are responsible for the final outcome. That is, high quality software that adheres to the specs. You need to include in the instructions to the agent how it can automatically verify it is building the right thing, including instructions to build those tools if they don’t exist (i.e. Unit Tests, Integration Tests, Monitoring Tools, etc). This is not different to when we used to build software in pre-agentic times, it is just that now it becomes a fundamental requirement to automate the verification process to unleash the true power of agentic flows.
TIP 5: This technique (putting an agent in a loop) can be expensive. Monitor your costs, look at tasks your agent is working through, and adjust models accordingly. Simple tasks can be solved with cheaper models such as Haiku or similar.
TIP 6: Use git worktrees to isolate agents work. You can effectively have multiple loops running on different areas of a monorepo at the same time.
Why this technique works
The main reason why this technique works is its simplicity. On a more technical level, it works because it solves the fundamental problem when using AI tools: The limited Context Window. The agent focus gets diluted the more content you add to the Context Window.
A complex work cannot be solved in one session. One-Prompt shot to solve real world problems doesn’t exist. The Context Window will fill up before we even get halfway; we need multiple sessions. Software Construction is an iterative process by nature. The agentic loops solve and automate this process. Some agents such as Claude Code have a built-in mechanism to compact the Context Window to make more space available to continue ‘in the flow’. This generally renders poor results, as we have no control over what gets summarised; in most cases, not what matters the most. The agentic loops technique puts us in control. There will rarely be a need to compact the Context Window, as it should not get filled up, because the agent will work on only a single task, small enough, on each turn. On the next turn, it will start fresh, with the full Context Window available to start working on the next most important thing.
As a bonus, some agents, such as Claude Code, have the concept of subagents built-in. In that case, the main agent can spawn subagents to work on different subtasks reporting the outcome to the main agent. Each subagent has its own Context Window, meaning that work done by subagents doesn’t pollute the main agent’s Context Window.
An opinionated implementation of a Ralph Loop
If you search for ‘Ralph Loop’, you will find a lot these days, and every implementation out there is opinionated by definition. The point of this article is not to convince you to use any specific implementation, but to explain how and why this technique works, its limitations and workarounds, from first principles. With that, you can then assess whether certain implementation is good for you, or implement your own.
As I was exploring and experimenting with this technique, I decided to implement my own version of a Ralph Loop, as that gave me full control to experiment different things with high flexibility. I choose to implement these loops not using the CLIs directly but via the existing SDKs. In particular, I created a Node.js implementation for two agent flavours using claude-agent-sdk and copilot-sdk. They both use the Claude Code and Copilot CLIs respectively under the hood, but provided me with higher control to operate the loop, and capture logs and usage stats. You can find the current implementation at GitHub. Bear in mind this was just a tool I created (most code AI-generated) to experiment and learn about this, and therefore it is not a polished and finished product. Fork this as a starting point and adapt it to your needs.
Final Thoughts
Depending on where you are in your journey with AI Tools for Software Engineering, you might find this technique too intimidating or too simple. I felt confused initially when I started looking into this, as I found a lot of materials from people talking about the technique, but little advice on how to put something together to start applying it. This is why I decided to write this article and share my unpolished and imperfect implementation of Ralph Loops in case you are looking for somewhere to start. For me, looking at code, even a prototype, always helps to clear my ideas.
At some point, you will need to give this technique a go. This is the future for Software Engineering. At least the near future. As I was finishing writing this article, Anthropic released an experimental implementation of this technique in Claude Code they called Agent Teams. We will see more vendors trying to standardise and incorporate their own implementation in their own development tools. You have all to win if you understand how and why it works.
My suggestion is start small to familiarise yourself with this technique before attempting more advanced automations:
- Pick a small problem, one that perhaps you won’t need to solve with this technique, but will serve to get you started and put this into practice; an ice breaker.
- Observe patterns, what works, what doesn’t work, and incorporate that into your prompt and instructions to the agent.
- Adapt this workflow to you and your team. The simplicity of this technique makes it very flexible.
What’s the smallest task you could run through a loop this week?
What task outside Software Engineering would you like to solve using this technique?